4台のラズパイでk8sクラスタを組んだ
ラズパイでk8sクラスタを組んだのでその記録を残す。
自分で物理サーバーを組んで、ネットワークなどを色々と学びたいというのがモチベ。
最終的に出来上がったものはこちら。
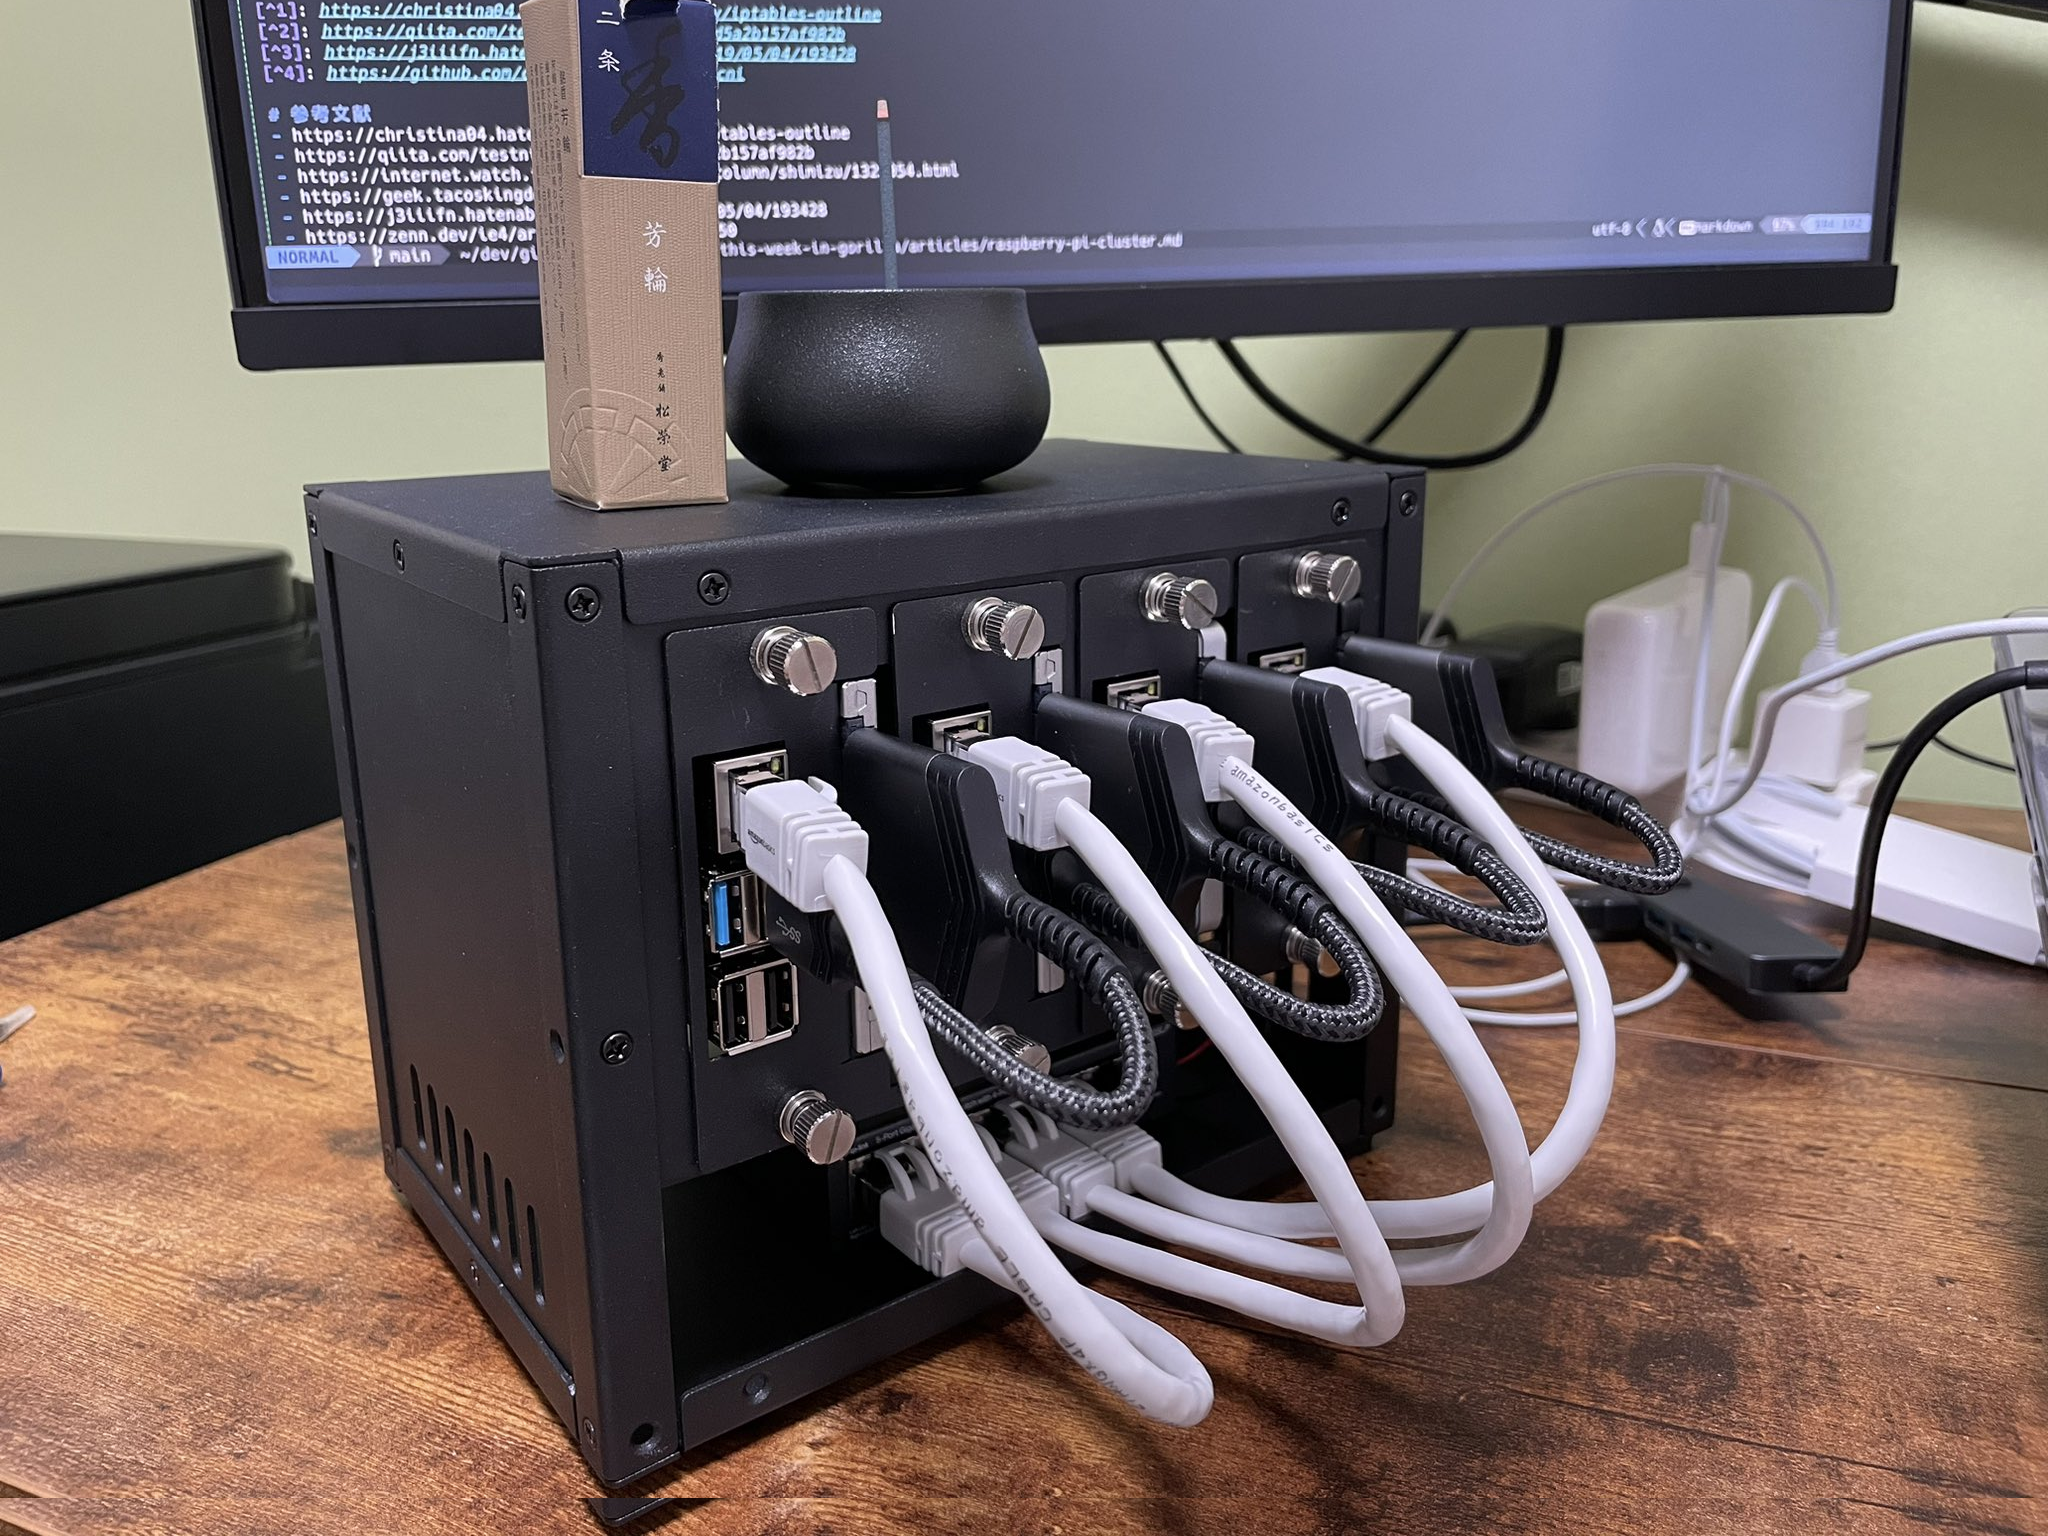
材料一覧
| 材料 | 個数 | 値段 |
|---|---|---|
| ラズパイ | 4 | 57200 |
| PoE+ HAT | 4 | 14080 |
| ラック | 1 | 10944 |
| PoE+ スイッチングハブ | 1 | 5400 |
| Transcend SSD 240GB 2.5インチ | 1 | 2490 |
| KIOXIA 内蔵 SSD 240GB 2.5インチ | 2 | 5960 |
| エレコム HDMI (メス) - micro HDMI (オス ) 変換アダプタ | 1 | 690 |
| LAN | 5本入 | 1358 |
| SATA USB変換アダプター | 4 | 5196 |
| USBキーボード | 1 | 2630 |
| 合計 | 105948 |
ラックについて
今回買ったラックは、なぜかネジを締めるとWIFIが繋がらなくなる事象が発生した。多分金属製だからと思われる。
面白いことに、手をラックの近くに置くとWIFIがつながる。(繋がらない場合もある) すべてのラズパイがWIFI接続というわけではなくmasterのみなのであんまり影響がないが、本事象は完全に想定外だったのでラック選びは要注意。
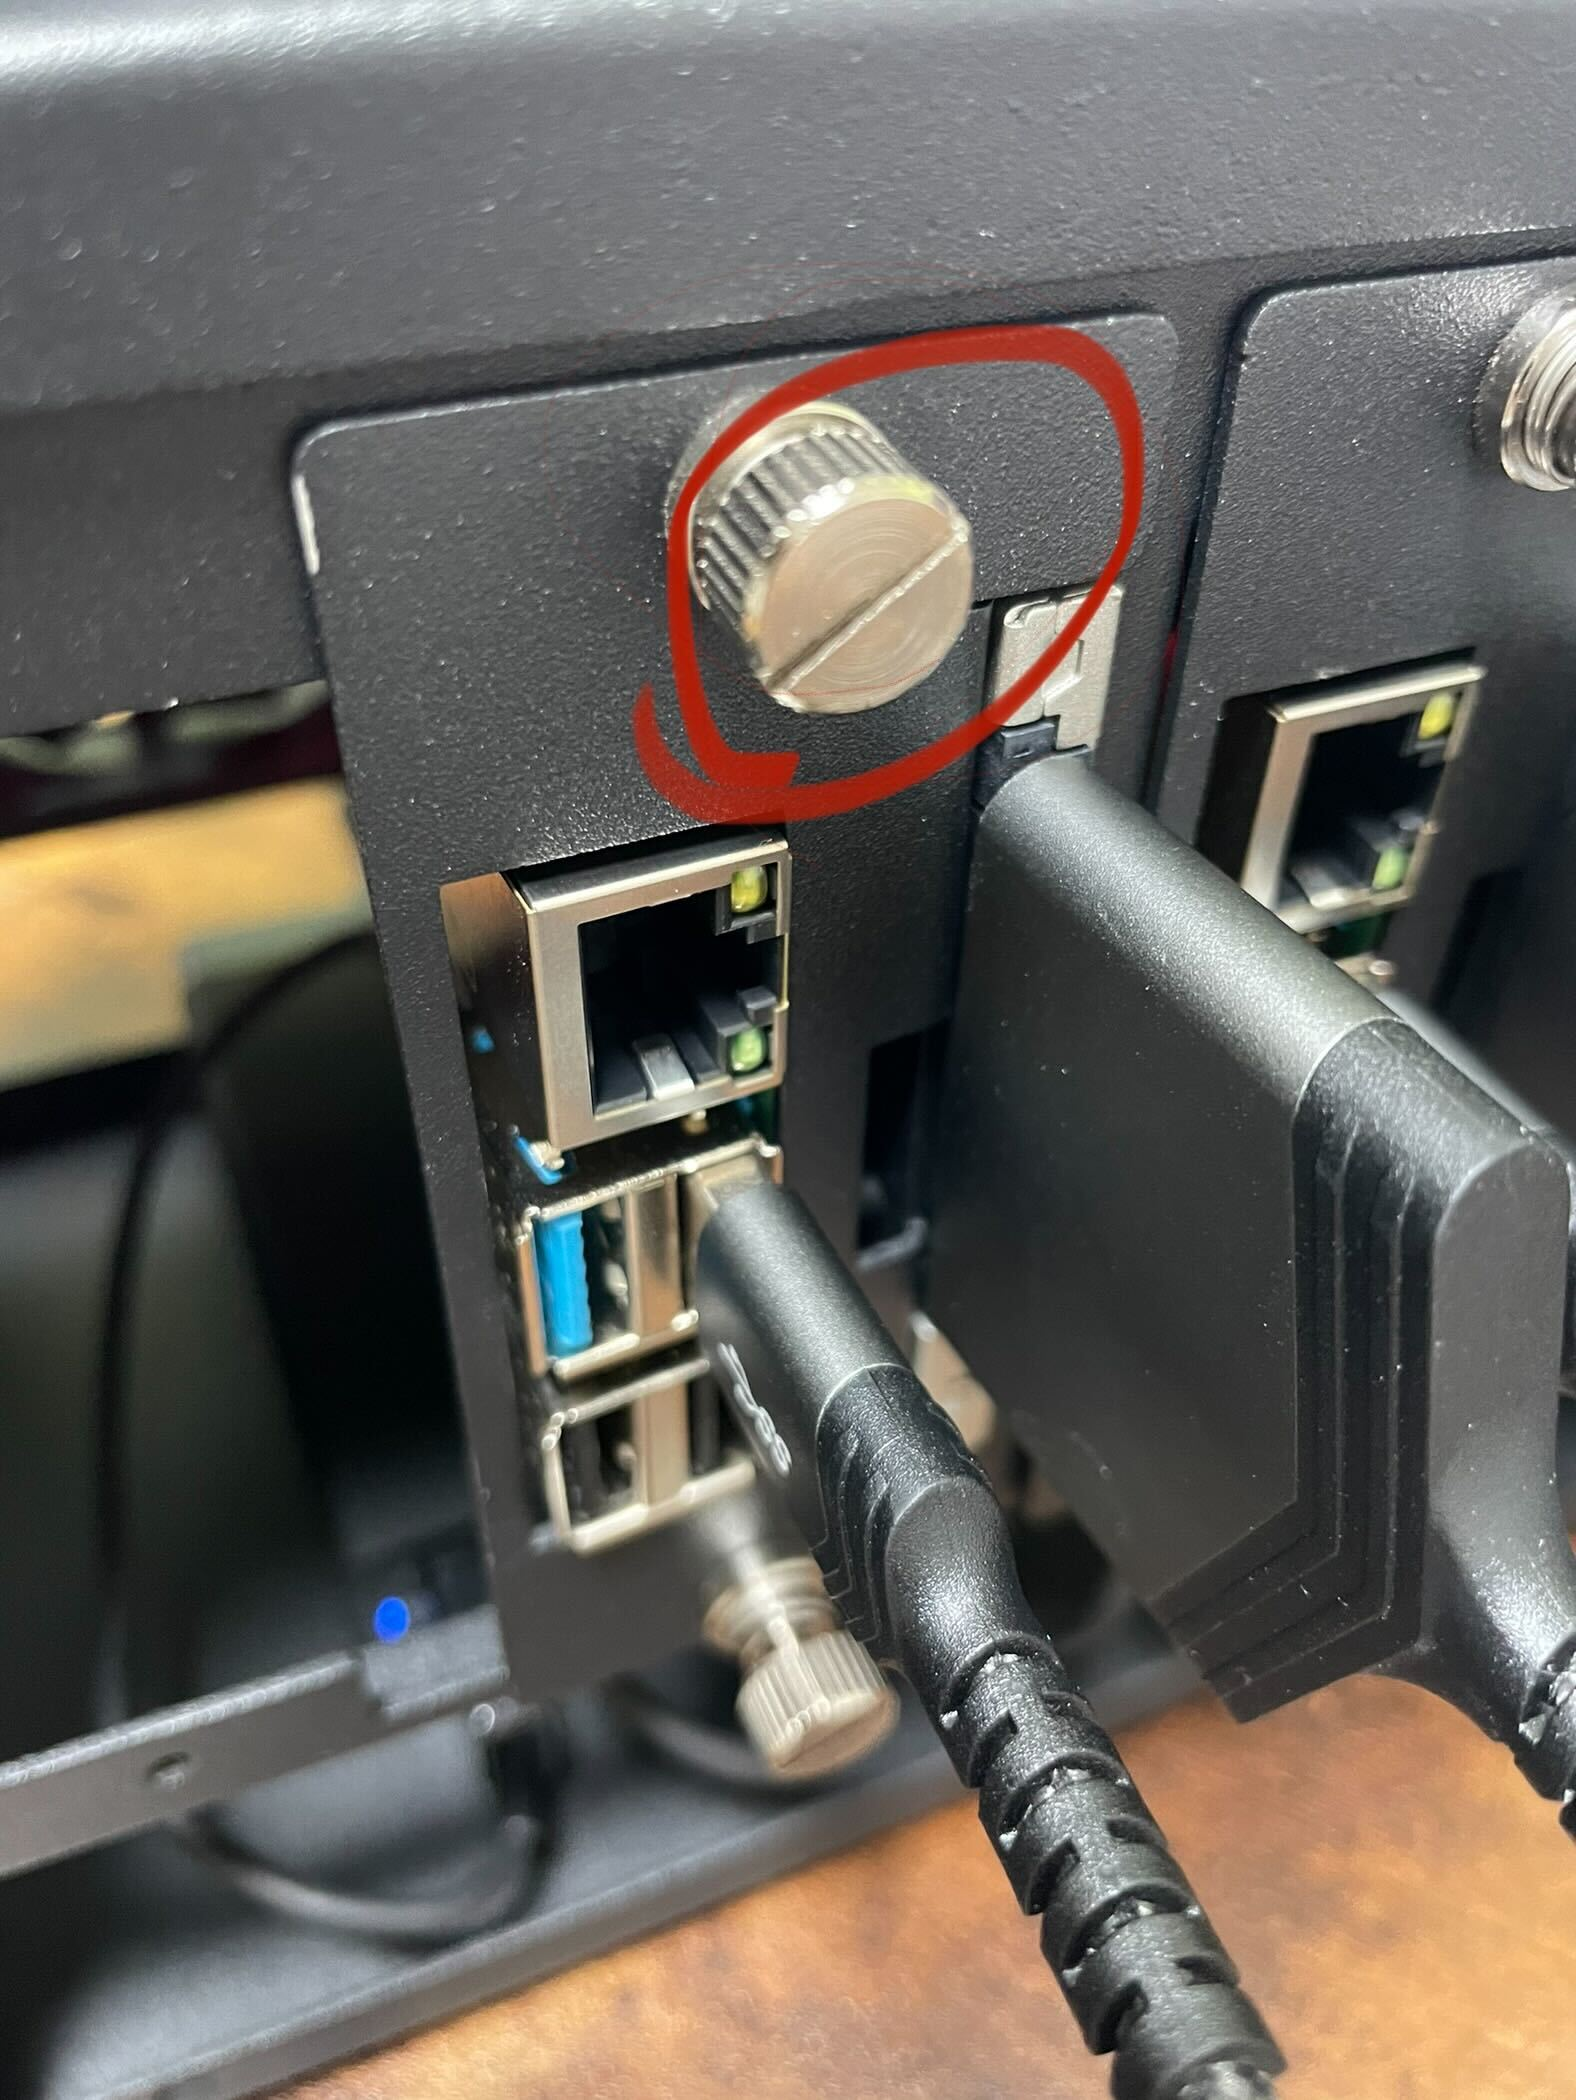
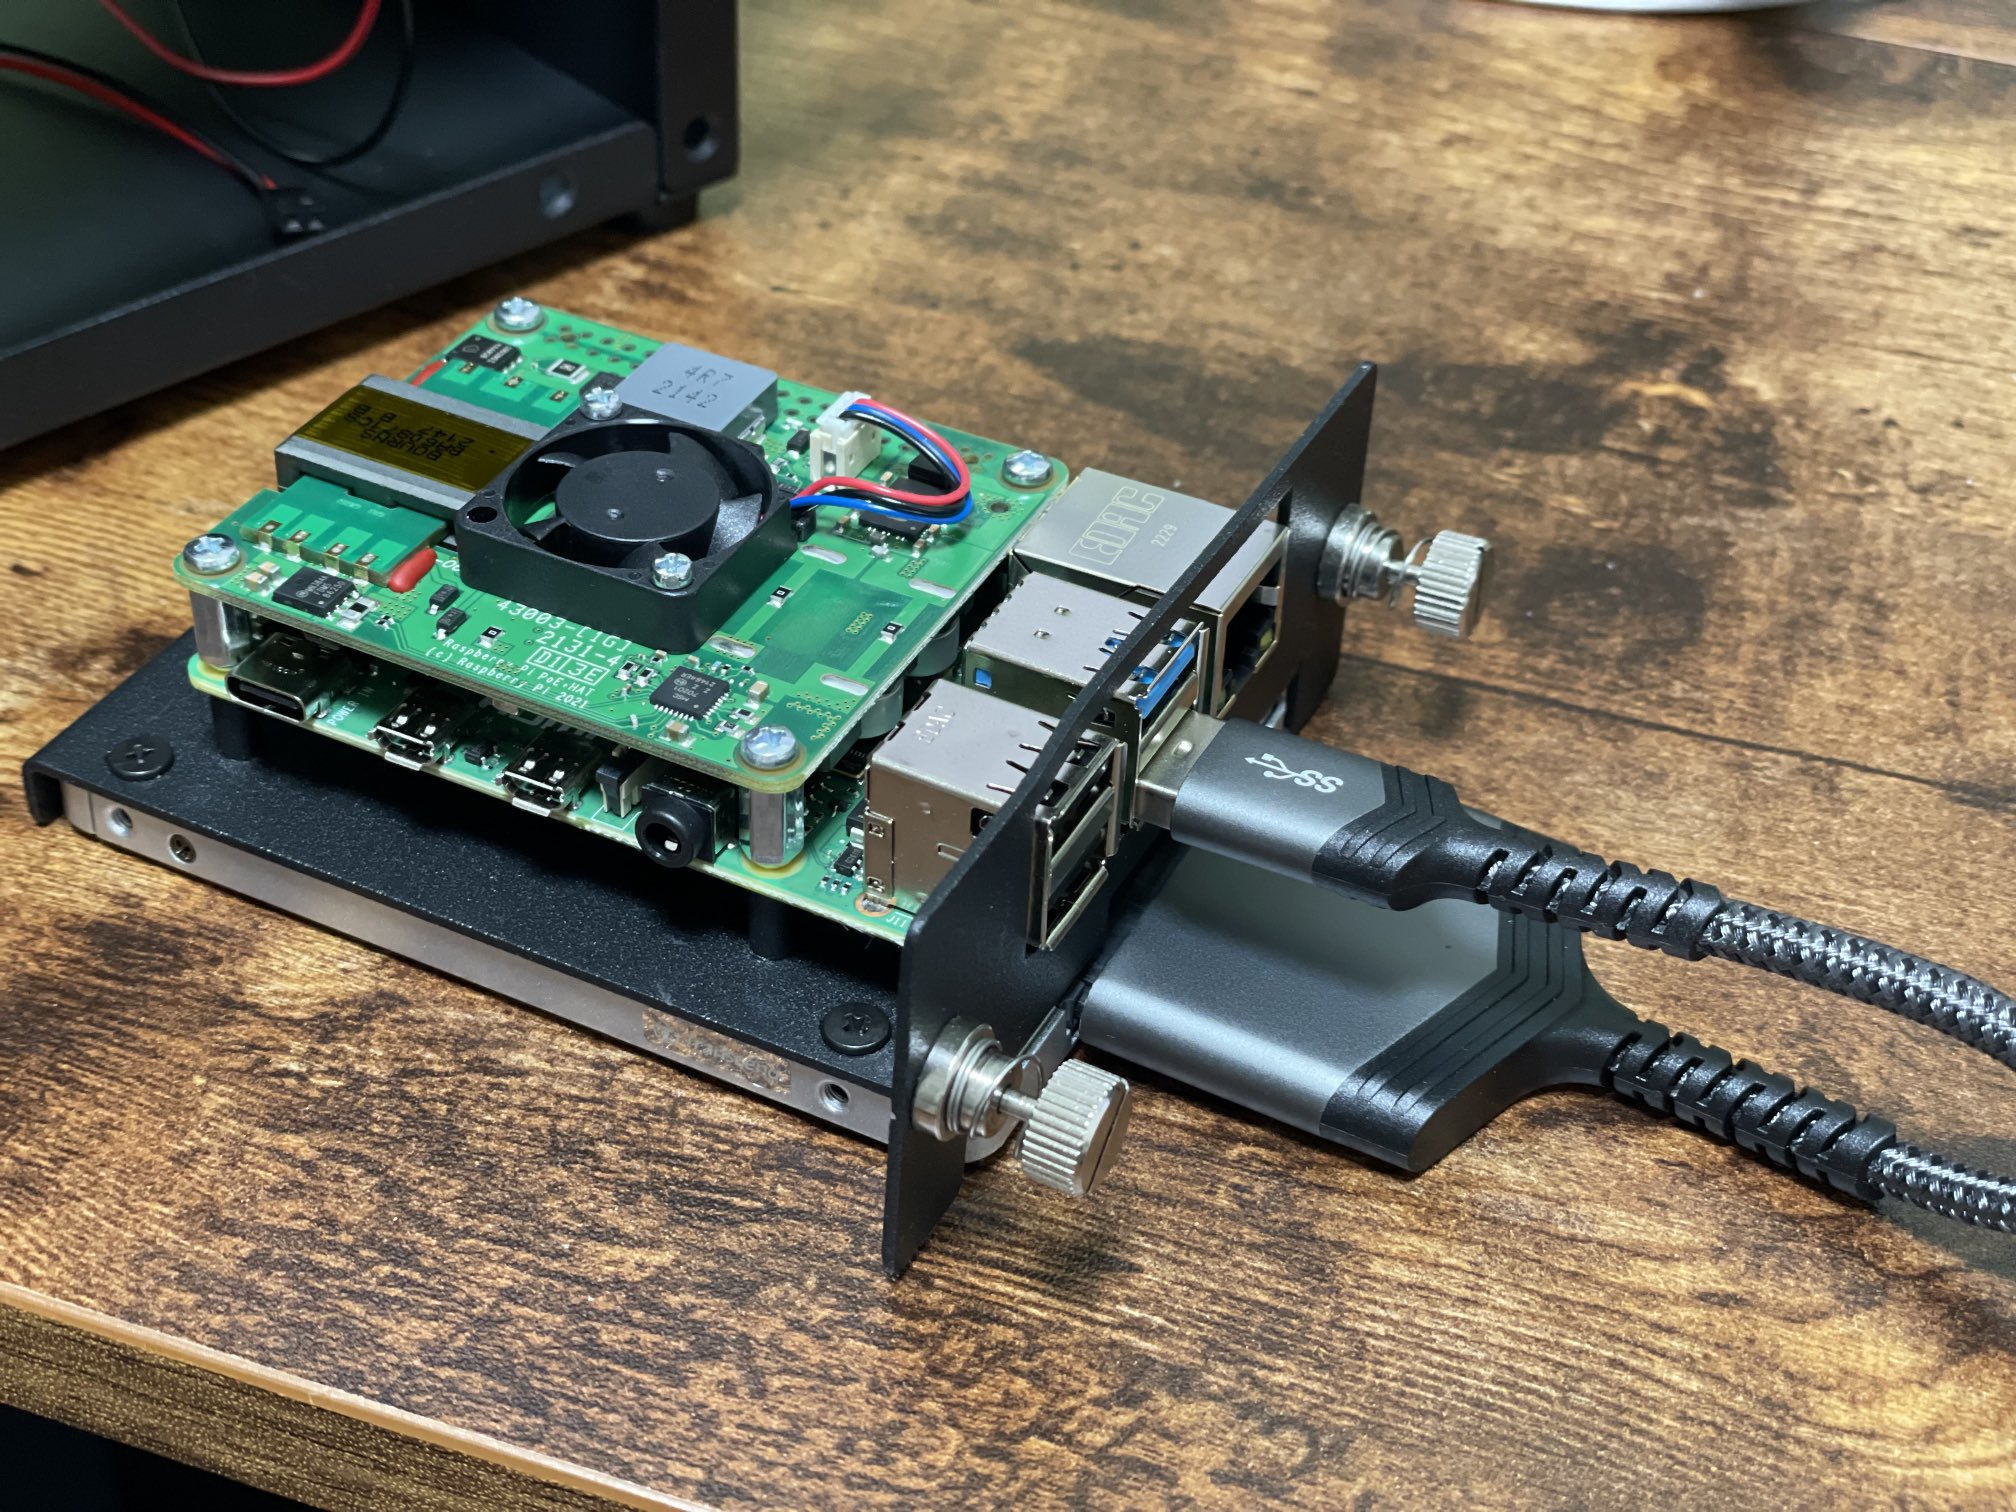
ラックの組み立て
説明書あったが、ネジの種類のラベルが貼っていなくて全然分からなかった。 ので、公式が動画を出しているのでこちらを参考に組み立てた。
なぜかネジが足りなかったり余ったりしているが、ガタガタしていないので一旦気にしない。
OSをSSDにインストール
OSは「Ubuntu Server 22.04.2 LTS(64bit)」を使う。
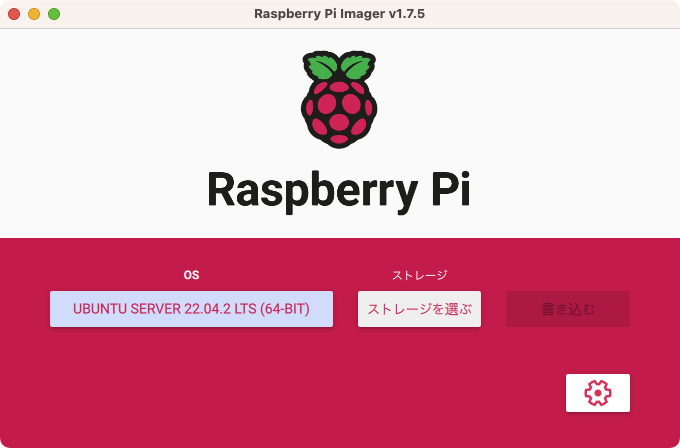
歯車のところからWIFIやssh、キーボードレイアウトなど設定をよしなにやる。
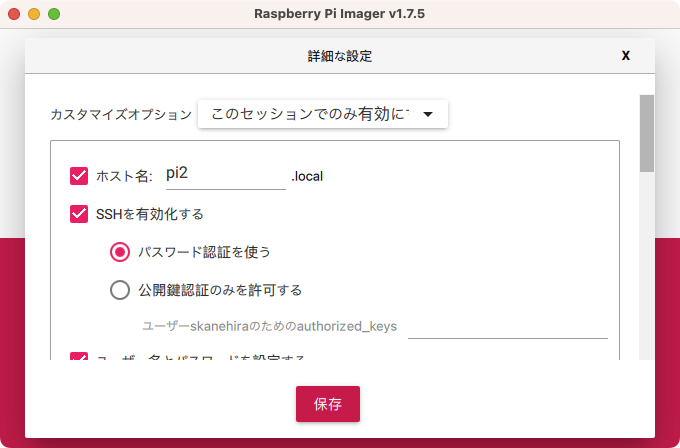
Mac側の接続設定
/etc/hostsにpi1の設定を追加する-localにしているのはあとからtailscaleを入れるときDNS名がpi1になるため192.168.3.15 pi1-local- sshの設定もする、pi2~pi4はWIFIは使わないので
pi1-localを踏み台に接続するHost pi1-local HostName pi1-local Port 22 User skanehira Host pi2 HostName pi2 Port 22 User skanehira ProxyCommand ssh pi1 -W %h:%p Host pi3 HostName pi3 Port 22 User skanehira ProxyCommand ssh pi1 -W %h:%p Host pi4 HostName pi4 Port 22 User skanehira ProxyCommand ssh pi1 -W %h:%p
OSの更新
apt update && apt full-upgrade画面が出てくるのでそのままEnter、終わったらreboot nowで再起動する。
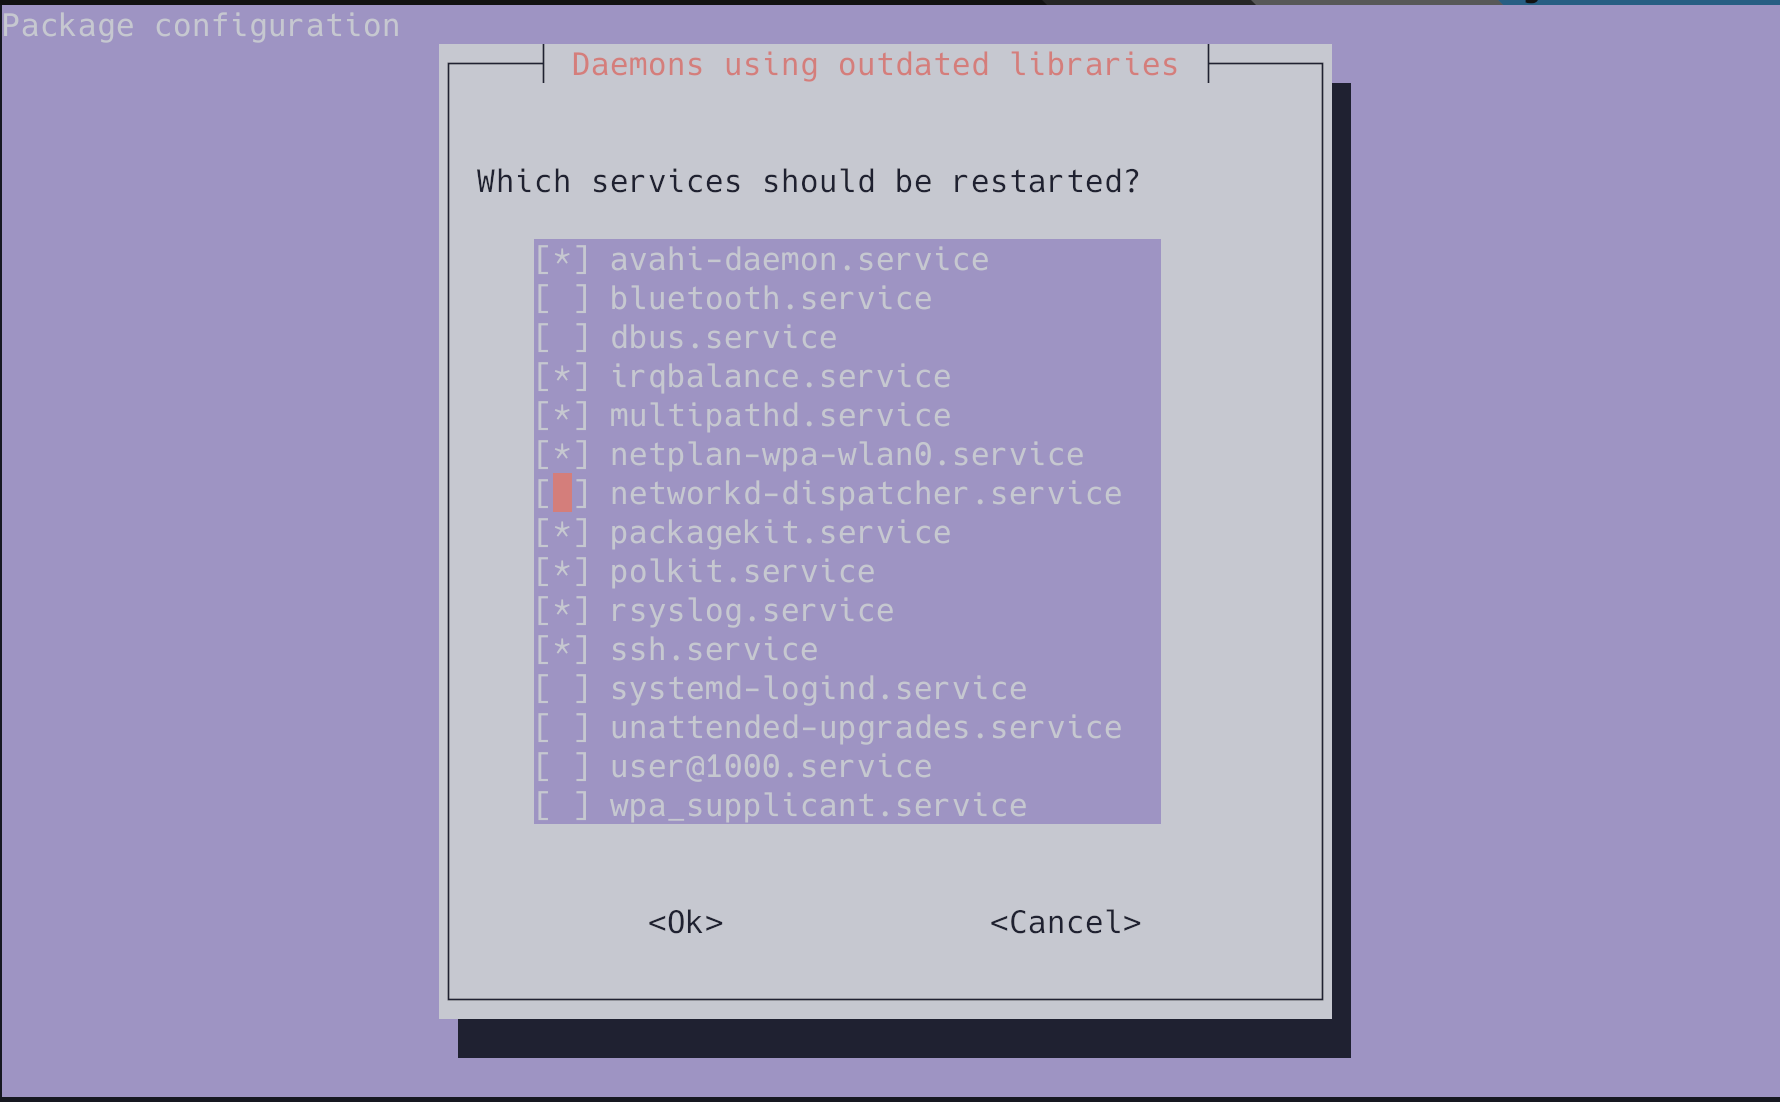
ネットワークの構成
- wlan0 はWIFI
- eth0 有線
- スイッチングハブでpi1~4同士を接続している
| ホスト名 | wlan0 IP | wlan0 デフォルトGW | eth0 IP | eth0 デフォルトGW |
|---|---|---|---|---|
| mac | 192.168.3.4 | 192.168.3.1 | - | - |
| pi1 | 192.168.3.15 | 192.168.3.1 | 192.168.1.1 | - |
| pi2 | - | - | 192.168.1.2 | 192.168.1.1 |
| pi3 | - | - | 192.168.1.3 | 192.168.1.1 |
| pi4 | - | - | 192.168.1.4 | 192.168.1.1 |
ネットワーク周りの設定
pi1のネットワーク設定
- ネットワーク周りの設定はnetplanが使われている
- 50-cloud-init.yamlはnetplanによって書き戻されることがあるから、別ファイルを用意して編集
- netplanの書式は https://netplan.readthedocs.io/en/stable/netplan-yaml で確認できる
sudo cp /etc/netplan/50-cloud-init.yaml /etc/netplan/99-network.yaml/etc/netplan/99-network.yaml を開いて、次のように設定する。
network:
    version: 2
    ethernets:
      eth0:
        dhcp4: false
        addresses:
          - 192.168.1.1/24
        nameservers:
          addresses:
- 8.8.8.8/etc/netplan/50-cloud-init.yaml側にデフォルトゲートウェイがないのでそれを追加。これをしないとeth0からwlan0を通してインターネットに出れない。 ただ、これは書き換わる可能性があるので別ファイルで設定したいが、やり方分からず一旦これで進める。
network:
    version: 2
    wifis:
        renderer: networkd
        wlan0:
            access-points:
                XXXXXXXXXX:
                    password: XXXXXXXXXXXXX
            addresses: [192.168.3.15/24]
            # デフォルトゲートウェイを追加
            routes:
              - to: default
                via: 192.168.3.1
            nameservers:
              addresses: [192.168.3.1]
            dhcp6: false
            accept-ra: false
            link-local: []
編集したら設定を適用する。
skanehira@pi1:~$ sudo netplan apply問題なければeth0にIPが表示される。
skanehira@pi1:~$ ip a
...
2: eth0: <BROADCAST,MULTICAST,UP,LOWER_UP> mtu 1500 qdisc mq state UP group default qlen 1000
    link/ether d8:3a:dd:1e:50:50 brd ff:ff:ff:ff:ff:ff
    inet 192.168.1.1/24 brd 192.168.1.255 scope global eth0
       valid_lft forever preferred_lft forever
    inet6 fe80::da3a:ddff:fe1e:5050/64 scope link
       valid_lft forever preferred_lft forever
...
pi2~4のネットワーク設定
pi1と同様にeth0の設定をする。
network:
    version: 2
    ethernets:
      eth0:
        dhcp4: false
        addresses:
          - 192.168.1.3/24
        routes:
          - to: default
            via: 192.168.1.1
        nameservers:
          addresses:
- 8.8.8.8/etc/netplan/50-cloud-init.yamlのwifis項目をコメントアウトしてWIFIを使えないようにする。
pi1のNAT化
ipv4のパケット転送を有効化。 これによりeth0 <-> wlan0のパケット転送が有効になる。
sysctl -w net.ipv4.ip_forward=1 >> /etc/sysctl.confiptables[1]の設定をする。
# 送信元のアドレスを変換する
iptables -t nat -A POSTROUTING -o wlan0 -j MASQUERADE
# wlan0(WIFI) -> eth0(LAN) のパケットは確立済みのものだけを許可する
# -A 新しいルールをチェインに追加
# -i パケットを受信するNIC
# -o パケットを送信するNIC
iptables -A FORWARD -i wlan0 -o eth0 -m state --state RELATED,ESTABLISHED -j ACCEPT
# eth0(LAN) -> wlan(WIFI)のパケットを許可する
iptables -A FORWARD -i eth0 -o wlan0 -j ACCEPTiptablesの設定を永続化する[2]
apt install -y iptables-persistent
netfilter-persistent save
ホスト名の設定
/etc/hostsの設定を変更する場合 cloud-init で管理されているため、rebootすると上書きされてしまう[3]- ので、hostsを追加したい場合は、以下の
/etc/cloud/templates/hosts.debian.tmplを変更する必要がある - reboot面倒なので、同じ内容を
/etc/hostsにも追加 - pi1~3ともに設定する必要がある(後にk8sクラスタを作るときに必要なので)
pi1
192.168.1.2 pi2
192.168.1.3 pi3
192.168.1.4 pi4
pi2
192.168.1.1 pi1
192.168.1.3 pi3
192.168.1.4 pi4
pi3
192.168.1.1 pi1
192.168.1.2 pi2
192.168.1.4 pi4
pi4
192.168.1.1 pi1
192.168.1.2 pi2
192.168.1.3 pi3
k8sクラスタの構築
k8sクラスタを構築するにあたり、以下の資料を読んでネットワークの雰囲気を掴んだ。
- 整理しながら理解するKubernetesネットワークの仕組みを呼んでまずネットワーク周りを完全理解する。
- 第3回 Kubernetesのネットワーク~クラスタ環境でコンテナネットワークを構築する方法~
今回はkubeadmを使うので、公式ドキュメントを読みつつ構築してく。
必要なポートが空いているかを確認
こちらにポート一覧があるので、それらが空いているかを確認する。
swapの無効化
swapの確認をするとswapが無効になっているので何もしない。
root@pi1:~# swapon --show
root@pi1:~#
ランタイムのインストール
こちらを読むと事前にランタイム共通の設定を行う必要があるので、各ノードでそれをやっていく。 今回containerdを使う。
linux-modules-extra-raspiのインストール
こちらを読むと、 linux-modules-extra-raspiを入れないとCNI[4]が正常に動かないらしいので入れておく。
root@pi1:~# apt install -y linux-modules-extra-raspi
root@pi1:~# reboot now
カーネルモジュールのロードと設定
# 起動時にロードするカーネルモジュールの設定
# ref: https://man.kusakata.com/man/modules-load.d.5.html
root@pi1:~# cat <<EOF | sudo tee /etc/modules-load.d/k8s.conf
overlay
br_netfilter
EOF

# カーネルモジュールをロードする
root@pi1:~# modprobe overlay
root@pi1:~# modprobe br_netfilter

# lsmod でロード済みのモジュールを確認
# 出力は Module | Size | Used by という順番
root@pi1:~# lsmod | grep br_netfilter
br_netfilter           32768  0
bridge                319488  1 br_netfilter
root@pi1:~# lsmod | grep overlay
overlay               155648  0
カーネルパラメータの設定
# この構成に必要なカーネルパラメーター、再起動しても値は永続します
root@pi1:~# cat <<EOF | sudo tee /etc/sysctl.d/k8s.conf
net.bridge.bridge-nf-call-iptables  = 1
net.bridge.bridge-nf-call-ip6tables = 1
net.ipv4.ip_forward                 = 1
EOF

# 再起動せずにカーネルパラメーターを適用
root@pi1:~# sysctl --system

# カーネルパラメータが適用されていることを確認
root@pi1:~# sysctl net.bridge.bridge-nf-call-iptables net.bridge.bridge-nf-call-ip6tables net.ipv4.ip_forward
net.bridge.bridge-nf-call-iptables = 1
net.bridge.bridge-nf-call-ip6tables = 1
net.ipv4.ip_forward = 1
コンテナランタイムのインストール
今回はcontainerdを使うので、インストールはこちらを参照して行う。
Option 1: From the official binariesに沿ってバイナリをダウンロードして配置する。
# containerdバイナリをダウンロードして展開
root@pi1:~# curl -LO https://github.com/containerd/containerd/releases/download/v1.7.2/containerd-1.7.2-linux-arm64.tar.gz && tar -C /usr/local -xzvf containerd-1.7.2-linux-arm64.tar.gz
# バイナリが配置されていることを確認する
root@pi1:~# ls -la /usr/local/bin/containerd*
-rwxr-xr-x 1 root root 40118648 Jun  3 08:06 /usr/local/bin/containerd
-rwxr-xr-x 1 root root  6422528 Jun  3 08:06 /usr/local/bin/containerd-shim
-rwxr-xr-x 1 root root  8060928 Jun  3 08:06 /usr/local/bin/containerd-shim-runc-v1
-rwxr-xr-x 1 root root 11534336 Jun  3 08:06 /usr/local/bin/containerd-shim-runc-v2
-rwxr-xr-x 1 root root 18939904 Jun  3 08:06 /usr/local/bin/containerd-stress
systemdのunitファイルを配置して起動する。
# unitファイルを配置する
root@pi1:~# mkdir -p /usr/local/lib/systemd/system
root@pi1:~# curl -L https://raw.githubusercontent.com/containerd/containerd/main/containerd.service > /usr/local/lib/systemd/system/containerd.service
root@pi1:~# ls -la /usr/local/lib/systemd/system/containerd.service
-rw-r--r-- 1 root root 1414 Jun 10 22:04 /usr/local/lib/systemd/system/containerd.service

# unitファイルを適用
root@pi1:~# systemctl daemon-reload

# containerdを起動
root@pi1:~# systemctl enable --now containerd
Created symlink /etc/systemd/system/multi-user.target.wants/containerd.service → /usr/local/lib/systemd/system/containerd.service.
root@pi1:~# systemctl is-active containerd
active
runcをインストールする。
root@pi1:~# cd /tmp/
root@pi1:/tmp# curl -LO https://github.com/opencontainers/runc/releases/download/v1.1.7/runc.arm64
root@pi1:/tmp# install -m 755 runc.arm64 /usr/local/sbin/runc
root@pi1:/tmp# ls -la /usr/local/sbin/runc
-rwxr-xr-x 1 root root 8951304 Jun 10 22:10 /usr/local/sbin/runc
root@pi1:/tmp# cd -
CNI pluginsをインストールする。
root@pi1:~# mkdir -p /opt/cni/bin
root@pi1:~# curl -LO https://github.com/containernetworking/plugins/releases/download/v1.3.0/cni-plugins-linux-arm-v1.3.0.tgz && tar -C /opt/cni/bin -xzvf cni-plugins-linux-arm-v1.3.0.tgz
root@pi1:~# ls /opt/cni/bin
bandwidth  dhcp   firewall     host-local  loopback  portmap  sbr     tap     vlan
bridge dummy host-device ipvlan macvlan ptp static tuning vrfcontainerdにsystemd cgroupドライバーを適用する。
# デフォルトの設定を書き出す
root@pi1:~# mkdir /etc/containerd
root@pi1:~# containerd config default > /etc/containerd/config.toml
config.tomlを開いて、SystemdCgroupをtrueに書き換える
[plugins."io.containerd.grpc.v1.cri".containerd.runtimes.runc]
  ...
  [plugins."io.containerd.grpc.v1.cri".containerd.runtimes.runc.options]
SystemdCgroup = true適用するためにcontainerdを再起動する。
root@pi1:~# systemctl restart containerd
root@pi1:~# systemctl is-active containerd
active
kubeadm、kubelet、kubectlのインストール
こちらに沿ってやっていく。
root@pi1:~# apt install -y apt-transport-https ca-certificates
root@pi1:~# curl -fsSL https://packages.cloud.google.com/apt/doc/apt-key.gpg | sudo gpg --dearmor -o /etc/apt/keyrings/kubernetes-archive-keyring.gpg
root@pi1:~# echo "deb [signed-by=/etc/apt/keyrings/kubernetes-archive-keyring.gpg] https://apt.kubernetes.io/ kubernetes-xenial main" | sudo tee /etc/apt/sources.list.d/kubernetes.list
deb [signed-by=/etc/apt/keyrings/kubernetes-archive-keyring.gpg] https://apt.kubernetes.io/ kubernetes-xenial main
root@pi1:~# apt update
root@pi1:~# apt install -y kubelet kubeadm kubectl
# apt-mark はsudo updateによるパッケージの更新を抑制する
# ref: https://atmarkit.itmedia.co.jp/ait/articles/1709/07/news016.html#:~:text=%E3%80%8Capt%20upgrade%20%E3%83%91%E3%83%83%E3%82%B1%E3%83%BC%E3%82%B8%E3%80%8D%E3%81%A7%E6%9B%B4%E6%96%B0%E3%81%99%E3%82%8B%E3%83%91%E3%83%83%E3%82%B1%E3%83%BC%E3%82%B8%E3%82%92%E6%8C%87%E5%AE%9A%E3%81%97%E3%81%9F%E5%A0%B4%E5%90%88%E3%80%81%E9%96%A2%E9%80%A3%E3%81%99%E3%82%8B%E3%83%A9%E3%82%A4%E3%83%96%E3%83%A9%E3%83%AA%E3%81%AA%E3%81%A9%E3%82%82%E4%B8%80%E7%B7%92%E3%81%AB%E6%9B%B4%E6%96%B0%E3%81%95%E3%82%8C%E3%82%8B%E3%81%93%E3%81%A8%E3%81%8C%E3%81%82%E3%82%8A%E3%81%BE%E3%81%99%E3%80%82%E3%81%93%E3%81%AE%E3%83%A9%E3%82%A4%E3%83%96%E3%83%A9%E3%83%AA%E3%82%92%E4%BD%BF%E3%81%A3%E3%81%A6%E3%81%84%E3%82%8B%E4%BB%96%E3%81%AE%E3%83%91%E3%83%83%E3%82%B1%E3%83%BC%E3%82%B8%E3%82%82%E3%80%81%E6%9B%B4%E6%96%B0%E3%81%95%E3%82%8C%E3%81%A6%E3%81%97%E3%81%BE%E3%81%84%E3%81%BE%E3%81%99%E3%80%82
root@pi1:~# apt-mark hold kubelet kubeadm kubectl
kubelet set on hold.
kubeadm set on hold.
kubectl set on hold.
k8sクラスタを作成する
kubeletが使うcgroupドライバーを指定する。
root@pi1:~# vim /etc/default/kubelet
# 以下を追加
KUBELET_EXTRA_ARGS=--cgroup-driver=systemd
kubeadm initでクラスタを作る。PodネットワークのCIDRはflannelに合わせる。
root@pi1:~# kubeadm init --pod-network-cidr=10.244.0.0/16 --control-plane-endpoint=pi1 --apiserver-cert-extra-sans=pi1成功すると以下のメッセージが出る。
Your Kubernetes control-plane has initialized successfully!

To start using your cluster, you need to run the following as a regular user:

  mkdir -p $HOME/.kube
  sudo cp -i /etc/kubernetes/admin.conf $HOME/.kube/config
  sudo chown $(id -u):$(id -g) $HOME/.kube/config

Alternatively, if you are the root user, you can run:

  export KUBECONFIG=/etc/kubernetes/admin.conf

You should now deploy a pod network to the cluster.
Run "kubectl apply -f [podnetwork].yaml" with one of the options listed at:
  https://kubernetes.io/docs/concepts/cluster-administration/addons/

You can now join any number of control-plane nodes by copying certificate authorities
and service account keys on each node and then running the following as root:

  kubeadm join pi1:6443 --token asmgqb.45uzw6gg6y2h7jfm \
        --discovery-token-ca-cert-hash sha256:163db964c9d7f9c20f245b75b0b05ea1e6220868f844980825521257e2fbc780 \
        --control-plane

Then you can join any number of worker nodes by running the following on each as root:

kubeadm join pi1:6443 --token asmgqb.45uzw6gg6y2h7jfm \
--discovery-token-ca-cert-hash sha256:163db964c9d7f9c20f245b75b0b05ea1e6220868f844980825521257e2fbc780kubectlを使えるようにするため、普段使うユーザで以下のコマンドを実行する。
skanehira@pi1:~# mkdir -p $HOME/.kube
skanehira@pi1:~# sudo cp -i /etc/kubernetes/admin.conf $HOME/.kube/config
skanehira@pi1:~# sudo chown $(id -u):$(id -g) $HOME/.kube/config残りのノードを同じ手順でコンテナランタイムとkubeadmなどをインストールして、kubeadm joinする。 問題なければ、次のように成功する。
root@pi2:~# kubeadm join pi1:6443 --token asmgqb.45uzw6gg6y2h7jfm \
        --discovery-token-ca-cert-hash sha256:163db964c9d7f9c20f245b75b0b05ea1e6220868f844980825521257e2fbc780
[preflight] Running pre-flight checks
[preflight] Reading configuration from the cluster...
[preflight] FYI: You can look at this config file with 'kubectl -n kube-system get cm kubeadm-config -o yaml'
[kubelet-start] Writing kubelet configuration to file "/var/lib/kubelet/config.yaml"
[kubelet-start] Writing kubelet environment file with flags to file "/var/lib/kubelet/kubeadm-flags.env"
[kubelet-start] Starting the kubelet
[kubelet-start] Waiting for the kubelet to perform the TLS Bootstrap...

This node has joined the cluster:
* Certificate signing request was sent to apiserver and a response was received.
* The Kubelet was informed of the new secure connection details.

Run 'kubectl get nodes' on the control-plane to see this node join the cluster.
Podネットワークアドオンをインストール
今回はflannelを使う。こちらを参照する。
root@pi1:~# kubectl apply -f https://github.com/flannel-io/flannel/releases/latest/download/kube-flannel.yml
namespace/kube-flannel created
serviceaccount/flannel created
clusterrole.rbac.authorization.k8s.io/flannel created
clusterrolebinding.rbac.authorization.k8s.io/flannel created
configmap/kube-flannel-cfg created
daemonset.apps/kube-flannel-ds createdこれで構築は完了なので、各ノードのステータスを確認してReadyになっていれば問題なし。
ちなみに、自分の環境だとNetwork plugin returns error: cni plugin not initializedがしばらく出たあとに、5分ほどで問題なくReadyになった。
skanehira@pi1:~$ k get nodes
NAME   STATUS   ROLES           AGE     VERSION
pi1    Ready    control-plane   3h35m   v1.27.2
pi2    Ready    <none>          3h6m    v1.27.2
pi3    Ready    <none>          177m    v1.27.2
pi4 Ready <none> 5m2s v1.27.2試しにこちらのマニフェストを使ってnginxをデプロイして動作確認する。
skanehira@pi1:~$ curl -LO https://gist.githubusercontent.com/sdenel/1bd2c8b5975393ababbcff9b57784e82/raw/f1b885349ba17cb2a81ca3899acc86c6ad150eb1/nginx-hello-world-deployment.yaml
skanehira@pi1:~$ kubectl apply -f nginx-hello-world-deployment.yaml
skanehira@pi1:~$ kubectl get pods
NAME                     READY   STATUS    RESTARTS   AGE
nginx-8466656475-c77jw   1/1     Running   0          2m36s
skanehira@pi1:~$ curl pi1:30001
Hello world!
skanehira@pi1:~$ curl pi2:30001
Hello world!
skanehira@pi1:~$ curl pi3:30001
Hello world!
skanehira@pi1:~$ curl pi4:30001
Hello world!
tailscale のセットアップ
外出時にsshでクラスタをいじれるようにtailscaleをインストールする。
https://tailscale.com/download/linux/ubuntu-2204
インストールと設定
root@pi1:~# curl -fsSL https://tailscale.com/install.sh | sh
root@pi1:~# tailscale up --ssh

To authenticate, visit:

        https://login.tailscale.com/a/xxxxxxx
URLを開いてConnectを押す。
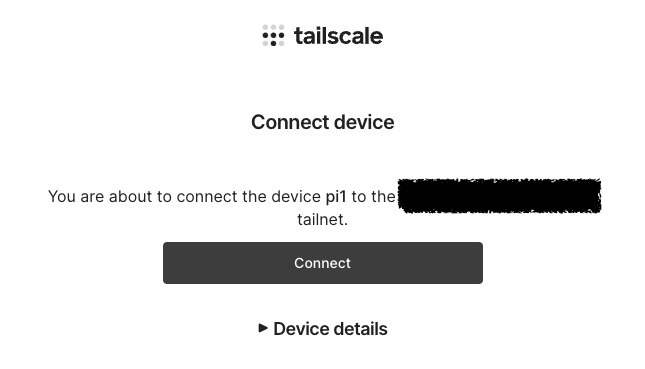
同様にssh接続するMacにも入れる。 公式ではダウンロードするかmasを使うとあるが、masを使ってもインストールできなかったので普通にApp Storeでインストールした。(権限周りが原因っぽい?)
設定が終わったら、同じVPNにいるのでsshできるようになるので接続してみる。
ssh pi1残課題
- 現時点、なぜかネットワークが激遅い(パッケージダウンロードが500KBくらい)ので、image pullとかしているとsshでのキーボード入力がままならない。 ラズパイのWIFI自体が貧弱だからだろうか?非常に困っているので、なんとか改善したいところ。
- 最終的にはk8sで動かしているPodをtailscaleでインターネットからアクセスできたら楽しそう。
2023/06/11 追記
ネットワークが遅い件
WIFIだと遅すぎて使っていてしんどいので有線接続に変更した。 それに伴い、eth0に2つのIPを割り当ててWIFIをすべて無効化した。
skanehira@pi1:~$ cat /etc/netplan/99-network.yaml
network:
    version: 2
    ethernets:
      eth0:
        dhcp4: false
        addresses:
          - 192.168.1.1/24
          - 192.168.3.16/24
        routes:
          - to: default
            via: 192.168.3.1
        nameservers:
          addresses:
            - 8.8.8.8
            - 192.168.3.1
        dhcp6: false
        accept-ra: false
        link-local: []
また、iptablesのNAT設定も変更した
# 既存のwlan0への変換を削除して、eth0のIP変換を行うように変更
root@pi1:~# iptables -t nat -D POSTROUTING -o wlan0 -j MASQUERADE
root@pi1:~# iptables -t nat -A POSTROUTING -o eth0 -j MASQUERADE
root@pi1:~# netfilter-persistent save
さいごに
ずっとやりたかったラズパイでk8sクラスタを組んでみた。さらにtailscaleでいつでもどこでもラズパイクラスタできた。
k8sクラスタ自体は特に問題なくすんなり構築できたけど、OSのネットワークよくわからんくて色々と詰まっていた。
雰囲気でデフォルトゲートウェイやiptablesを理解していたけど、今回の構築で完全理解したのでもう大丈夫と思われる。
参考文献
- https://christina04.hatenablog.com/entry/iptables-outline
- https://qiita.com/testnin2/items/fc1a3ad5a2b157af982b
- https://internet.watch.impress.co.jp/docs/column/shimizu/1325054.html
- https://geek.tacoskingdom.com/blog/66
- https://j3iiifn.hatenablog.com/entry/2019/05/04/193428
- https://zenn.dev/ie4/articles/8e6a5ae9ac1250
