おうちk8sクラスタにVaultを構築する
普段GitHubのSSHの鍵やPATなどをいつも手動で管理、設定をしていた。 手動で発行するだけならまだしも、PATなどのローテーションはできれば自動化しておきたい。
ちょうど最近おうちk8sクラスタを組んだので、せっかくだしHashCorp Vaultをk8sに載せてもう少しセキュアに機密情報を管理したい。 ということで実際にVaultをk8s上に構築してみた。
k8sクラスタ構成
| ホスト名 | OS | 役割 |
|---|---|---|
| pi1 | Ubuntu Server 22.04.2 LTS | コントロールプレーン |
| pi2 | 同上 | ワーカー1 |
| pi3 | 同上 | ワーカー2 |
| pi3 | 同上 | ワーカー3 |
前提知識
HelmやVaultは雰囲気でしか知らないので、以下の資料などを読んでキャッチアップした。
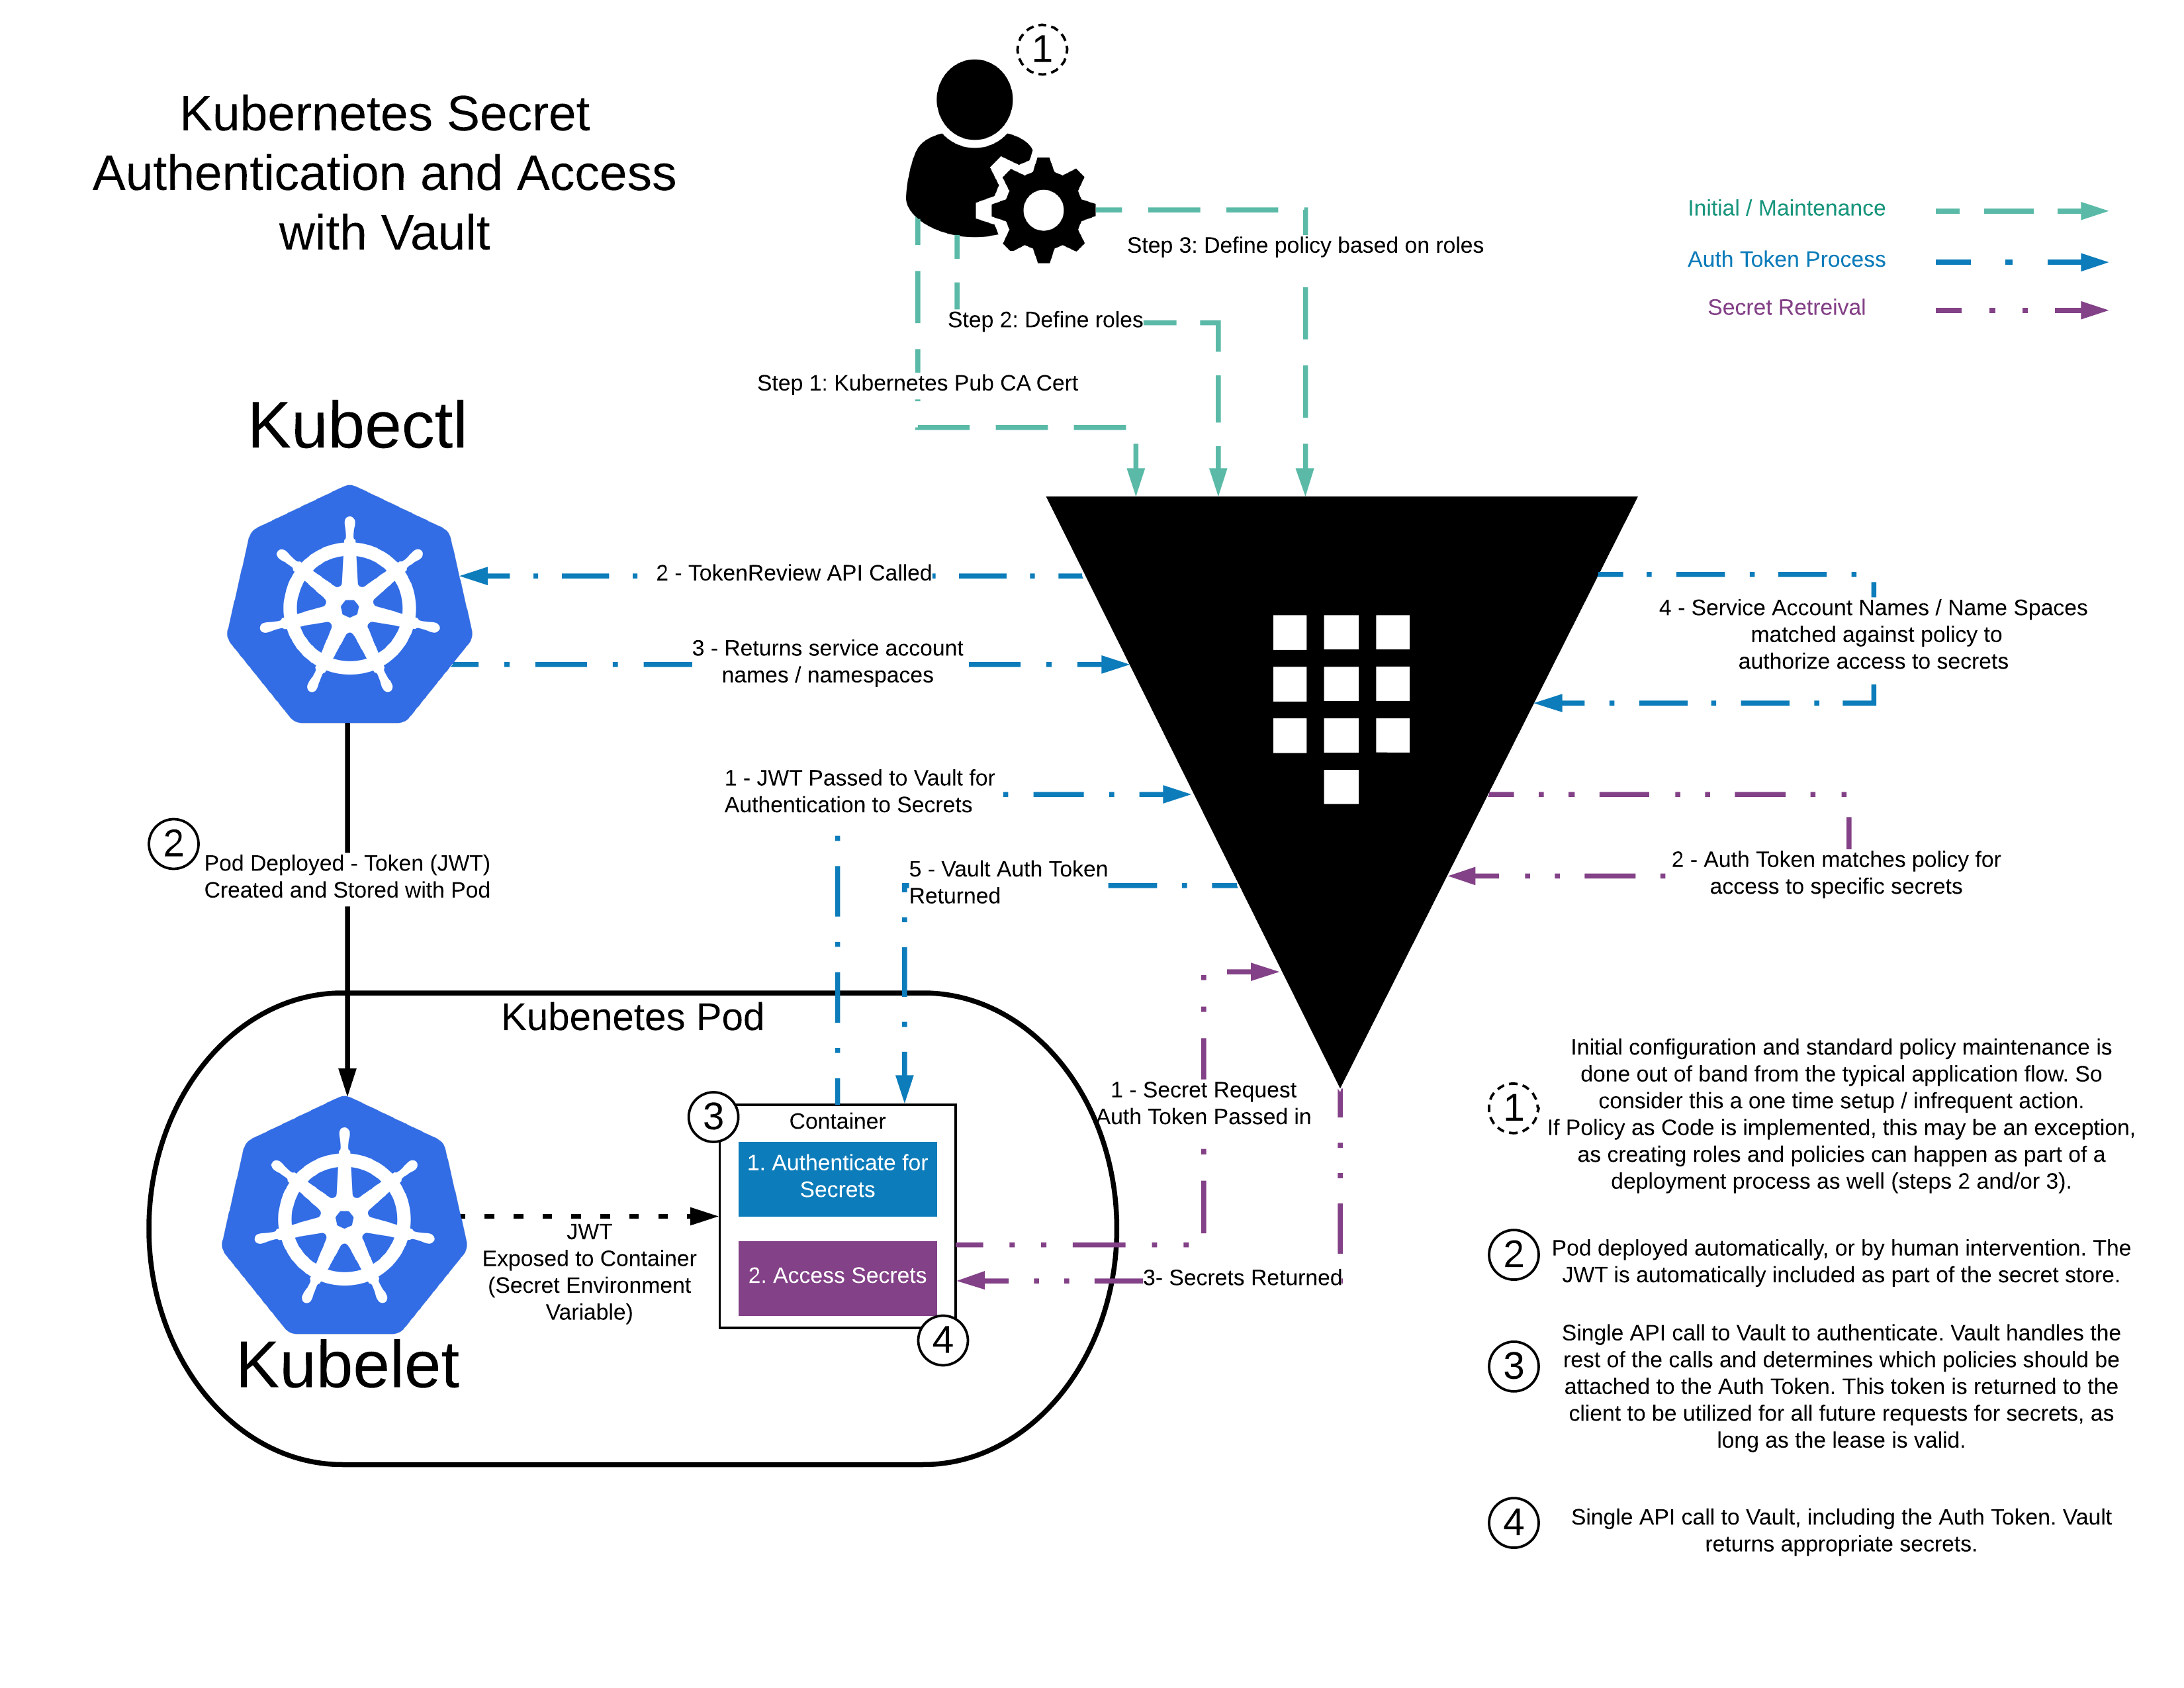
Vaultに関してはこの図はわかりやすかった。

ストレージの構築
Vaultをk8sで動かす際にPVCが必要なので、それ用のストレージをpi1に構築していく。 今回は以下の情報を参考した。
- https://www.server-world.info/query?os=Ubuntu_20.04&p=nfs&f=1
- https://www.server-world.info/query?os=Ubuntu_20.04&p=kubernetes&f=6
- https://linuxjm.osdn.jp/html/nfs-server/man5/exports.5.html
# NFSをインストール
root@pi1:~# apt -y install nfs-kernel-server

# Domain を pi1 に変更する
root@pi1:~# vim /etc/idmapd.conf
root@pi1:~# cat /etc/idmapd.conf
[General]

Verbosity = 0
# set your own domain here, if it differs from FQDN minus hostname
Domain = pi1

[Mapping]

Nobody-User = nobody
Nobody-Group = nogroup

# 公開用のディレクトリを作成
root@pi1:~# mkdir -p /home/nfsshare/vault
root@pi1:~# chown -R nobody:nogroup /home/nfsshare

# 最終行にマウント設定を追加
root@pi1:~# vim /etc/exports
root@pi1:~# cat /etc/exports
# /etc/exports: the access control list for filesystems which may be exported
#               to NFS clients.  See exports(5).
#
# Example for NFSv2 and NFSv3:
# /srv/homes       hostname1(rw,sync,no_subtree_check) hostname2(ro,sync,no_subtree_check)
#
# Example for NFSv4:
# /srv/nfs4        gss/krb5i(rw,sync,fsid=0,crossmnt,no_subtree_check)
# /srv/nfs4/homes  gss/krb5i(rw,sync,no_subtree_check)
/home/nfsshare 192.168.1.0/24(rw,sync,all_squash,no_subtree_check)

root@pi1:~# systemctl restart nfs-server
試しにpi1にファイルを作成して、pi2からmountして動作確認してみる。
root@pi1:~# echo "hello" > /home/nfsshare/hello.txt
root@pi1:~# cat /home/nfsshare/hello.txt
hello# `nfs-common`を入れないと以下のエラーが発生する
# 他のノードにも同様に`nfs-common`をインストールしておく必要がある
# mount: /mnt/pi1: bad option; for several filesystems (e.g. nfs, cifs) you might need a /sbin/mount.<type> helper program.
root@pi2:~# apt install nfs-common
root@pi2:~# mkdir /mnt/pi1
root@pi2:~# mount -t nfs pi1:/home/nfsshare /mnt/pi1
root@pi2:~# cat /mnt/pi1/hello.txt
hello
# 動いたのでアンマウントしておく
root@pi2:~# umount /mnt/pi1以下のマニフェストを作ってPVを作成する。なお、参考した記事にはないがstorageClassNameが必要のようなのでそれを追記した。
apiVersion: v1
kind: PersistentVolume
metadata:
  name: vault
spec:
  capacity:
    storage: 10Gi
  accessModes:
    - ReadWriteOnce
  persistentVolumeReclaimPolicy: Retain
  storageClassName: slow
  nfs:
    path: /home/nfsshare/vault
    server: 192.168.1.1
readOnly: falseroot@pi1:~# kubectl apply -f nfs-pv.yaml
persistentvolume/vault created
root@pi1:~# kubectl get pv
NAME CAPACITY ACCESS MODES RECLAIM POLICY STATUS CLAIM STORAGECLASS REASON AGE
vault 10Gi RWO Retain Available slow 10sVaultの構築
以下のドキュメントを参考に構築していく。
Vaultのnamespaceを作る。
root@pi1:~# kubectl create namespace vault
namespace/vault created
Helmのインストール
公式ドキュメントを参照してhelmをインストールする。
root@pi1:~# curl https://baltocdn.com/helm/signing.asc | gpg --dearmor | sudo tee /usr/share/keyrings/helm.gpg > /dev/null
root@pi1:~# apt install apt-transport-https --yes
root@pi1:~# echo "deb [arch=$(dpkg --print-architecture) signed-by=/usr/share/keyrings/helm.gpg] https://baltocdn.com/helm/stable/debian/ all main" | sudo tee /etc/apt/sources.list.d/helm-stable-debian.list
root@pi1:~# apt update
root@pi1:~# apt install helm
Helm Repoの追加
repoは2つあるけど、今回はhashicorp/vaultを使う。
root@pi1:~# helm repo add hashicorp https://helm.releases.hashicorp.com
root@pi1:~# helm search repo hashicorp/vault
NAME                                    CHART VERSION   APP VERSION     DESCRIPTION
hashicorp/vault                         0.24.1          1.13.1          Official HashiCorp Vault Chart
hashicorp/vault-secrets-operator        0.1.0           0.1.0           Official Vault Secrets Operator Chart
Helm Chartの設定
override-values.yamlを作って以下の設定を追記する。
# injectorは使わないので無効化
injector:
  enabled: false

server:
  dataStorage:
    # 作成したPVの`storageClass`を指定する
    storageClass: slow

ui:
  enabled: true
Vaultをデプロイする
helm installを使ってデプロイする。正常に完了する以下のようになる。
root@pi1:~# helm install vault hashicorp/vault --namespace vault -f override-values.yaml
NAME: vault
LAST DEPLOYED: Sun Jun 18 23:55:33 2023
NAMESPACE: vault
STATUS: deployed
REVISION: 1
NOTES:
Thank you for installing HashiCorp Vault!

Now that you have deployed Vault, you should look over the docs on using
Vault with Kubernetes available here:

https://www.vaultproject.io/docs/


Your release is named vault. To learn more about the release, try:

  $ helm status vault
  $ helm get manifest vault
念のため、デプロイされているのを確認する。
root@pi1:~# helm list --namespace vault
NAME    NAMESPACE       REVISION        UPDATED                                 STATUS          CHART          APP VERSION
vault   vault           1               2023-06-18 23:55:33.09130381 +0900 JST  deployed        vault-0.24.1   1.13.1
Podを確認する。
root@pi1:~# k get pods -n vault
NAME                                    READY   STATUS    RESTARTS   AGE
vault-0                                 0/1     Pending   0          82s
valuesの更新
override-values.yamlを変更してupgradeするときは以下のコマンドを実行する。
root@pi1:~# helm upgrade vault hashicorp/vault --namespace vault -f override-values.yamlVaultの初期化
Unseal keyとRoot Tokenが出力されるのでそれをメモしておく。 vault operator unsealを3回実行して、初期化を完了させる。
root@pi1:~# kubectl exec --stdin=true --tty=true vault-0 -n vault -- vault operator init
Unseal Key 1: aaaaaaaaaa
Unseal Key 2: bbbbbbbbbb
Unseal Key 3: cccccccccc
Unseal Key 4: dddddddddd
Unseal Key 5: eeeeeeeeee

Initial Root Token: XXXXXXXXXXXXXXXXXX

Vault initialized with 5 key shares and a key threshold of 3. Please securely
distribute the key shares printed above. When the Vault is re-sealed,
restarted, or stopped, you must supply at least 3 of these keys to unseal it
before it can start servicing requests.

Vault does not store the generated root key. Without at least 3 keys to
reconstruct the root key, Vault will remain permanently sealed!

It is possible to generate new unseal keys, provided you have a quorum of
existing unseal keys shares. See "vault operator rekey" for more information.
root@pi1:~#
root@pi1:~# kubectl exec --stdin=true --tty=true vault-0 -n vault -- vault operator unseal aaaaaaaaaa
root@pi1:~# kubectl exec --stdin=true --tty=true vault-0 -n vault -- vault operator unseal bbbbbbbbbb
root@pi1:~# kubectl exec --stdin=true --tty=true vault-0 -n vault -- vault operator unseal ccccccccccコマンドを実行するとSealedがfalseになるのを確認。
Key             Value
---             -----
Seal Type       shamir
Initialized     true
Sealed          false
Total Shares    5
Threshold       3
Version         1.13.1
Build Date      2023-03-23T12:51:35Z
Storage Type    file
Cluster Name    vault-cluster-690a32c4
Cluster ID      e4c8a45a-5d89-8ab0-ac3c-163b6ec60524
HA Enabled falsevaultのUIからログインして動いているかを確認するためport-forwardする。
root@pi1:~# kubectl port-forward vault-0 8200:8200 -n vault
Forwarding from 127.0.0.1:8200 -> 8200
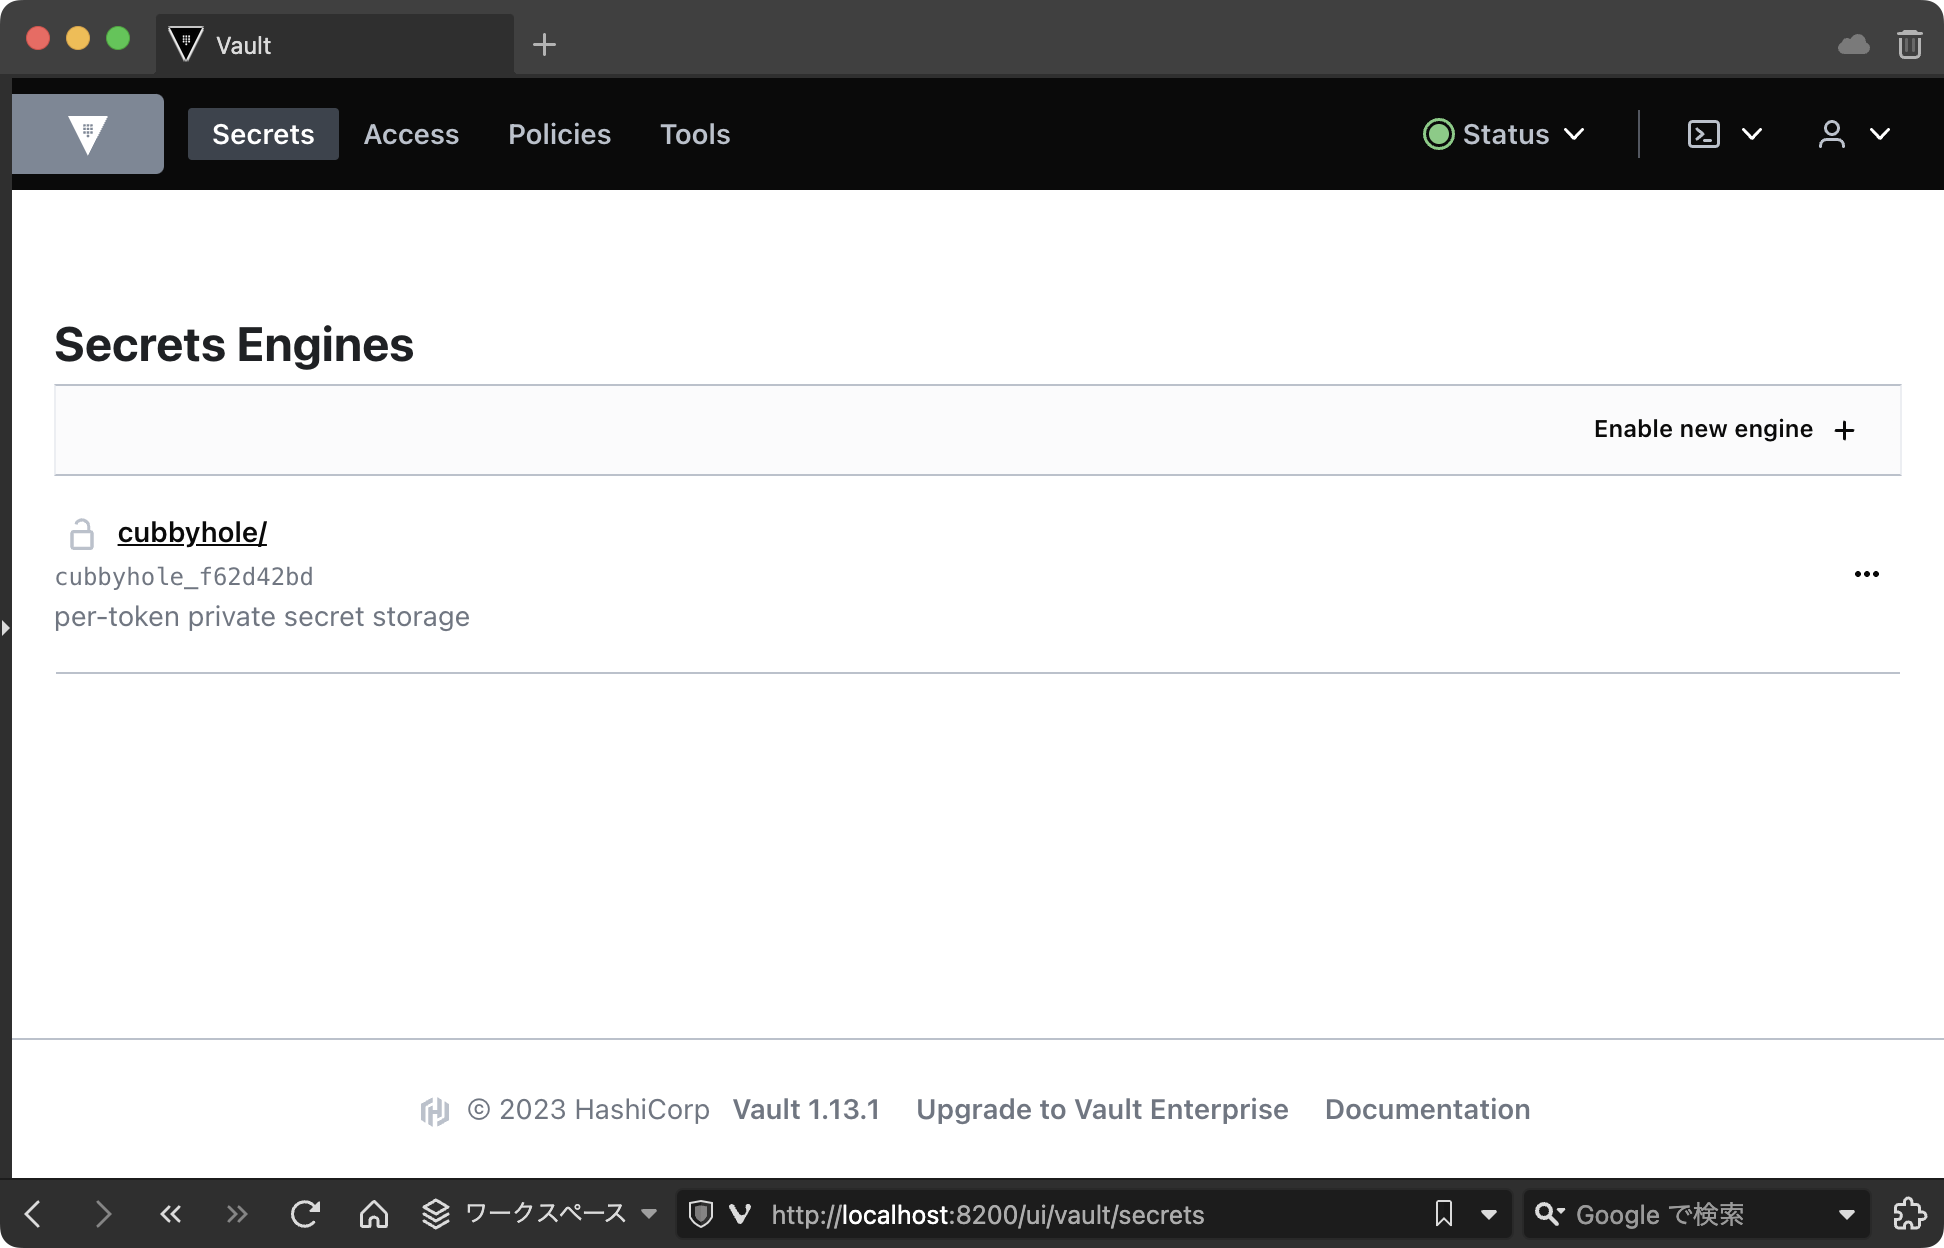
Forwarding from [::1]:8200 -> 8200ブラウザでhttp://localhost:8200にアクセスして、先程のRoot Tokenを使ってログインして、以下の画面が表示されれば問題なし。

Unseal key や Root token について
手順に出てきた Unseal key と Root token は以下のドキュメントを読むとわかる
https://developer.hashicorp.com/vault/docs/concepts/seal
ドキュメントのこの文章がすべてを語っているが...
要約すると、ほとんどのVaultデータはキーリング内の暗号化キーを使って暗号化され、キーリングはルートキーによって暗号化され、ルートキーは封印解除キーによって暗号化されます。
自分の理解をまとめると以下となる。
- vaultに保存されているデータは暗号キーを使って暗号化されている
- 暗号キーはルートキーという暗号キーで暗号化された状態でキーリングに保存されている
- キーリングは複数の鍵に分割されたキーのことらしい
- ルートキーはUnseal keyによって暗号化されている
- Unseal keyは分割されたキーで最低3つある
- これを複数人がそれぞれ保持しておくことでルートキーを簡単に復元できないようにしているのがミソっぽい
要はUnseal keyからルートキーを復号化して、ルートキーから暗号キーを復号化して、暗号キーからデータを復号化して…って流れのようだ。
Serviceを用意
HelmでインストールしたvaultはServiceがないのでクラスタ外からアクセスできない。 のでNodePortのServiceを用意して、外からアクセスできるようにする。
pi1はVPN内にいるので、最終的にはpi1:30820にアクセスできるようになる。
apiVersion: v1
kind: Service
metadata:
  name: vault-external
spec:
  type: NodePort
  ports:
    - name: http
      protocol: TCP
      port: 8200
      targetPort: 8200
      nodePort: 30820
  selector:
app.kubernetes.io/name: vaultroot@pi1:~# kubectl apply -f vault/service.yaml -n vault
root@pi1:~# kubectl get svc -n vault
NAME TYPE CLUSTER-IP EXTERNAL-IP PORT(S) AGE
vault ClusterIP 10.109.107.142 <none> 8200/TCP,8201/TCP 22h
vault-external NodePort 10.99.149.155 <none> 8200:30820/TCP 25m
vault-internal ClusterIP None <none> 8200/TCP,8201/TCP 22h
vault-ui ClusterIP 10.99.173.68 <none> 8200/TCP 22hこれでブラウザから http://pi1:30820 にアクセスすればログイン画面が表示される。
まとめ
とりあえず構築はできた。
あとはvaultがそもそも何ができるのか、何をどう設定すればやりたいことができるのかを触りながら理解していく。
これは別途記事にする予定。
